
12 Week NHS Aligned Programme for Gluteal Tendinopathy Exercises
- 4 hours ago
- 12 min read
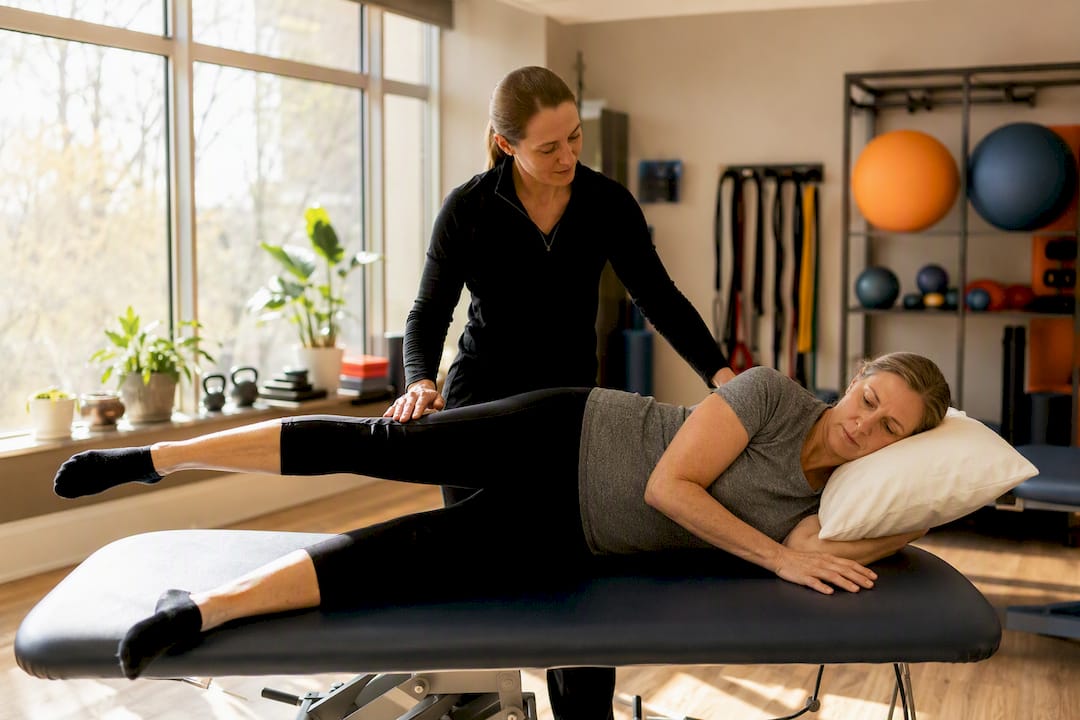
Exercise is the primary, evidence-based treatment for gluteal tendinopathy, and it should start with pain-relieving isometric holds before progressing to strength and functional loading. Exercise combined with education outperforms passive treatments like rest or a single steroid injection for lasting improvement. Expect early gains within weeks, but budget several months for full recovery, and see a clinician if pain worsens or fails to shift.
TL;DR:
Progressing from isometric holds to high-load, slow-velocity strength exercises is crucial after initial pain control to stimulate tendon adaptation effectively.
Exercise combined with education outperforms passive treatments, and pain should be monitored carefully to avoid setbacks during staged loading.
Use pain as a guide, with mild discomfort acceptable if it resolves within 24 hours, and avoid aggressive early-stage movements like deep squats or wide lunges.
Early stages focus on pain reduction through controlled isometric exercises, with progress based on symptom stability and controlled movement.
A personalized physiotherapy assessment ensures correct movement patterns and appropriate exercise progression, reducing the risk of setbacks.
Table of Contents
What is gluteal tendinopathy and why exercise helps
Gluteal tendinopathy is a chronic, load-related disorder of the tendons attaching the gluteus medius and minimus to the outer hip (the greater trochanter). Older terminology called this “trochanteric bursitis”, but that name is misleading. The tendon itself has failed to adapt to the demands placed on it, rather than simply becoming inflamed. This distinction matters because inflammation responds to rest, while a tendon that has lost tolerance to load needs the opposite: carefully dosed exercise.
The gluteus medius and minimus stabilise the pelvis every time you stand on one leg, whether that’s walking, climbing stairs, or standing at the sink. When these tendons weaken or become irritable, that everyday single-leg loading becomes the trigger for pain, which is why symptoms often flare during walking or standing rather than at rest.
Complete rest is one of the most common mistakes people make. It might feel logical, but rest actually reduces the tendon’s tolerance to load and risks muscle wasting around the hip, leaving you weaker and no better off. Graded loading works differently: it stimulates the tendon’s collagen structure to remodel and strengthen, gradually restoring its capacity to handle daily stress.
What graded exercise achieves over time:
Rebuilds tendon load tolerance through controlled, progressive stress
Strengthens the gluteus medius and minimus to improve pelvic stability during walking and stairs
Reduces pain by addressing the underlying capacity deficit, not just the symptom
Prevents the muscle wasting that prolonged rest tends to cause
What are the symptoms and when should you get a diagnosis?
Gluteal tendinopathy typically causes pain over the bony point on the outer hip, the greater trochanter, that can radiate down the outer thigh. It rarely travels below the knee. Pain usually worsens with specific provocations: lying on the affected side at night, climbing stairs, standing up after prolonged sitting, or standing predominantly on one leg (think doing the dishes or waiting in a queue).
A physiotherapist will typically assess your hip through a combination of palpation over the greater trochanter, single-leg stance tests, and resisted hip abduction to reproduce your symptoms. Imaging such as ultrasound or MRI isn’t usually needed for a first assessment. It becomes useful when symptoms don’t respond to a structured exercise programme, or when a clinician suspects a more significant tendon tear.
Certain features warrant prompt medical review rather than a home exercise trial:
Rapidly worsening pain or weakness over days rather than weeks
Severe pain that disturbs sleep and doesn’t ease with position changes
Numbness, tingling, or other neurological symptoms in the leg
Pain following a specific traumatic injury rather than gradual onset
No meaningful improvement after a couple of months of consistent, well-executed exercise
If any of those apply, book a physiotherapy assessment rather than persisting alone with a generic exercise sheet.
How do you safely progress gluteal tendinopathy exercises?
The staged approach exists because loading a sensitive tendon too aggressively, too soon, tends to backfire, while loading it too cautiously leaves it under-prepared for real life. Getting the sequence right is the entire game.
Isometric exercises, muscle contractions held without movement, are usually where rehabilitation begins. Heavy isometric holds can reduce pain through a central nervous system effect sometimes called exercise-induced hypoalgesia, giving you a genuine pain-relief window that can last for hours. That window is useful in itself, and it also makes isometrics a sensible way to keep loading the tendon without flaring symptoms early on.
Three principles govern safe progression:
Never aim for complete rest. Activity modification and pacing (reducing aggravating positions without stopping movement altogether) protects tendon capacity far better than stopping entirely.
Progress in a fixed order. Move from isometric holds, to controlled dynamic movement, to weight-bearing high-load, slow-velocity strengthening, only advancing once the current stage is comfortable.
Use pain as a guide, not a stop sign. Mild discomfort during exercise that settles within 24 hours is generally acceptable; pain that lingers into the next day, or disrupts sleep, means you’ve progressed too fast.
High-load, slow-velocity strengthening deserves particular attention because it’s the stage most home exercise sheets skip. This means heavier resistance moved slowly through a controlled range, rather than lighter resistance done quickly for higher repetitions. It’s the loading style that best drives tendon adaptation once the acute pain has settled, and it’s typically introduced from around week six onward, once isometric and light dynamic work is well tolerated.
Clinicians assessing whether to advance a patient to the next stage generally look for stable or improving morning pain, no sleep disruption, and better single-leg stance endurance before increasing load. If those markers aren’t present, the answer is to hold the current stage and refine technique rather than push forward regardless.
Pro Tip: Keep a simple daily note of your pain score first thing in the morning, on a 0 to 10 scale. A rising trend over several days, rather than a single bad day, is the real signal to ease off, not chase through.
Frequency matters as much as exercise selection. Isometric work is often done daily in the early stage, since its analgesic effect is short-lived and repeated dosing helps maintain that pain relief throughout the day. Higher-load strength sessions, by contrast, need recovery time between sessions, which is why they’re typically programmed two to three times a week rather than daily once you reach that stage.
A week-by-week gluteal tendinopathy exercise programme
This progression mirrors the staged template used in NHS patient exercise leaflets, adapted to individual tolerance. Treat the weeks as a guide, not a fixed deadline. Some people move through faster, others need longer at each stage, and that’s normal for tendon rehabilitation.
Weeks 1 to 3: calm things down and build a base
The goal here is pain control and gentle isometric loading, nothing more ambitious.
Isometric hip abduction (side-lying or standing against a wall). Hold for 30 to 45 seconds, repeated 3 to 5 times, with 1 to 2 minutes of rest between holds. Aim for this once or twice daily.
Gentle standing hip abduction (small range, no band). Light, controlled movement through a small range to maintain mobility without provoking compression at the tendon.
Activity pacing. Reduce, rather than eliminate, aggravating positions: standing on one leg for long periods, deep hip flexion, or sitting with legs crossed.
Progression criteria: move to weeks 3 to 6 once isometric holds no longer flare pain the following day, and morning stiffness or pain is stable or reducing.
Weeks 3 to 6: add controlled movement and bodyweight strength
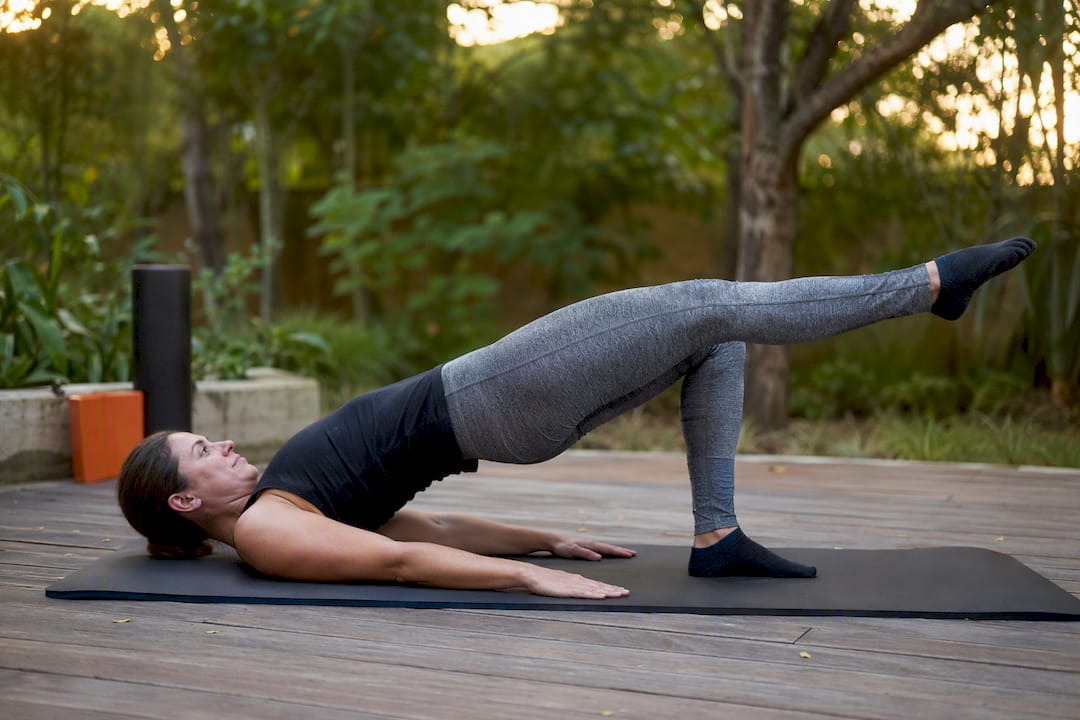
Double-leg glute bridge. Feet hip-width apart, squeeze the glutes to lift the hips, hold briefly at the top, then lower with control. Start with 2 to 3 sets of 8 to 12 repetitions.
Standing weight-bearing hip abduction with light resistance. Introduce a light resistance band around the ankles or just above the knees, moving the leg out to the side with a slow, controlled tempo.
Bridge progression toward single-leg. Once double-leg bridges feel easy and pain-free, begin introducing a single-leg variation for part of the set, building toward full single-leg bridges by the end of this phase.
Progression criteria: advance once you can complete bodyweight bridges and light banded abduction without pain lasting beyond the session, and single-leg standing balance feels more stable.
Weeks 6 to 12 and beyond: high-load strength and return to function
High-load, slow-velocity single-leg work. Single-leg bridges, step-ups, and split squats performed slowly, focusing on control through the full range rather than speed or repetition count.
Banded lateral walks (crab walks). Band positioned above the knees or around the ankles, small controlled side steps maintaining tension throughout, 2 to 3 sets of 10 to 15 steps each direction.
Graded return to impact. For those returning to running or sport, this means a structured reintroduction of jogging, then running, then sport-specific drills, only once strength work is well tolerated without flare-up.
Progression criteria: readiness for higher-load strength work and eventual return to impact depends on stable pain levels, good single-leg control, and the ability to complete the previous stage’s exercises across consecutive sessions without a pain spike. This isn’t a race. A 2024 meta-analysis found exercise-based programmes superior to minimal intervention for function specifically because participants followed a structured, staged loading protocol rather than jumping stages.
How do you perform the key exercises correctly?
Getting the movement pattern right matters more than how much weight or resistance you use, particularly early on. Poor form doesn’t just blunt results, it can actively provoke the tendon.
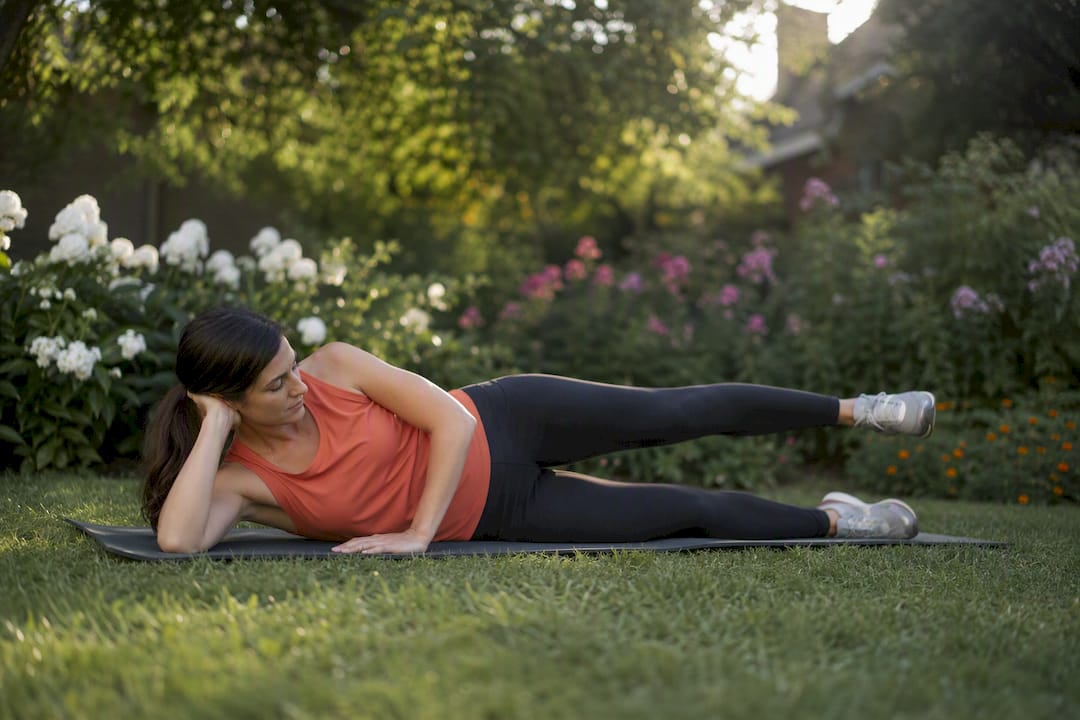
Isometric side-lying hip abduction. Lie on your unaffected side with hips stacked, not rolled forward or back. Lift the top leg slightly, keeping it in line with your body rather than swinging it forward, and hold. A forward-drifting leg shifts load onto hip flexors instead of the glute, and it can compress the tendon against the hip bone, the opposite of what you want. Increase load over time by adding a light ankle weight or holding for longer, not by lifting the leg higher.
Bridges, double-leg progressing to single-leg. Keep your ribs stacked over your pelvis rather than arching through the lower back to gain height. The lift should come from the glutes squeezing, not from over-extending the spine. When you move to single-leg bridges, watch for the hips dropping or rotating on the unsupported side; that’s a sign the glute medius isn’t controlling the pelvis, which is exactly what you’re trying to train.
Banded squats and sideways band walks. Place the band above the knees for beginners, moving it down toward the ankles as strength improves for a greater challenge. Keep knees tracking in line with the toes throughout, resisting the tendency for them to cave inward, which reduces the effectiveness of the abductor work and can add strain elsewhere in the hip. In lateral band walks, take small, controlled steps rather than big strides, keeping tension on the band constant rather than letting it slacken between steps.
Pro Tip: Film yourself from the front during single-leg bridges or band walks. A dropping hip on the unsupported side is easy to miss by feel but obvious on video, and it’s the single most common compensation pattern clinicians see.
Keep hips level and stacked during side-lying work
Lift from the glute, not the lower back, during bridges
Track knees over toes during banded squats and walks
Increase load or hold time gradually rather than range of motion
Which movements and positions tend to aggravate the tendon?
Certain exercises and daily positions compress the gluteal tendons against the greater trochanter, which tends to provoke symptoms rather than build capacity, particularly in the early stages of rehabilitation.
Deep or wide squats, heavy loaded lunges, and aggressive hip stretches that push the leg across the body (a classic seated figure-four stretch, for instance) often worsen symptoms because they combine compression with load. That doesn’t mean these movements are permanently off-limits. It means they’re usually introduced later, once the tendon has built more tolerance through the staged programme above.
Practical modifications that help in the meantime:
Take stairs one at a time initially, or lead with the less symptomatic leg, rather than forcing a normal stride pattern
Avoid sitting in very low chairs or car seats that push the hip into deep flexion
Sit with knees roughly hip-width apart rather than crossed, which reduces compressive load at the tendon
Shorten running stride length temporarily if impact provokes symptoms, rather than stopping entirely
On acceptable pain during exercise: mild discomfort, roughly 3 or 4 out of 10, that settles within a day is generally fine and doesn’t mean you’re doing damage. Pain that climbs beyond that, or lingers into the next morning, is the cue to reduce resistance, range, or repetitions at your next session rather than pushing through regardless.
What daily habits support recovery alongside exercise?
Rehabilitation isn’t confined to your exercise sessions. What you do for the other 23 hours of the day has a real bearing on how quickly the tendon settles.
Small positional changes reduce compressive load without requiring you to stop moving. Avoiding low chairs, crossed legs, and excessive stair use in early stages all reduce direct pressure on the irritated tendon. At night, side-sleeping on the affected hip is usually the main culprit for disturbed sleep, so try sleeping on your back or on the unaffected side with a pillow between your knees to keep the hip in a neutral position.
Heat applied to the outer hip before exercise can ease stiffness and make movement more comfortable, and gentle massage around, rather than directly on, the tender point can help with general muscle tension. Avoid firm pressure directly over the trochanter itself, since that’s the compression you’re trying to reduce, not add.
Sleep on your back or unaffected side with a pillow between the knees
Apply heat before activity rather than ice, which many find less helpful for this condition
Keep a simple activity and pain log to spot patterns before they become setbacks
Manage bodyweight where relevant, since additional load through the hip during walking and stairs adds cumulative stress on the tendon
Pro Tip: If you’re building back to walking or exercise after a flare, increase either duration or intensity each week, never both at once. That single rule catches most overload setbacks before they happen.
When should you consider injections, PRP, shockwave or surgery?
Exercise remains the foundation of treatment, but some people need additional options alongside or after a structured programme, usually when progress stalls or pain is severe enough to limit participation in rehabilitation itself.
Corticosteroid injections can offer meaningful short-term pain relief, which is sometimes useful for breaking a particularly severe flare and enabling exercise to begin. However, the effect is often not sustained, and repeated injections may weaken the tendon tissue over time, which is why they’re generally used sparingly rather than repeatedly. In direct comparison, an 8-week structured exercise and education programme produced better outcomes and higher patient satisfaction than a single steroid injection or a wait-and-see approach.
Platelet-rich plasma (PRP) and shockwave therapy show some promising results in selected patients, though evidence remains mixed and they’re typically considered adjuncts rather than replacements for exercise
Surgery is reserved for recalcitrant cases, particularly confirmed full-thickness tendon tears that haven’t responded to conservative management
Onward referral to a specialist is generally appropriate if there’s no meaningful progress after 8 to 12 weeks of well-executed rehabilitation, or if imaging shows a higher-grade tear
How Parks Therapy Centre supports this rehabilitation pathway
A physiotherapy assessment at Parks Therapy Centre involves a detailed history, movement and strength testing, and identification of the specific loading patterns driving your symptoms, information a generic exercise sheet simply can’t provide. Supervised progression means dosage (sets, holds, resistance) gets adjusted to your response in real time, rather than following a fixed calendar regardless of how you’re actually recovering. If home exercises haven’t shifted things after several weeks, or pain is limiting basic activity, that’s the point to book an assessment rather than persist with guesswork. Read our complete guide to physiotherapy for hip pain for more on what a first appointment involves.
What the evidence gets right, and where generic advice falls short
Most consumer advice on gluteal tendinopathy exercises treats the topic as a list of movements: do these five things, in this order, forever. That misses the actual clinical insight, which is that timing and dosage matter more than the exercises themselves. An isometric hold performed with poor alignment, or a bridge progressed to single-leg too early, can undo weeks of steady progress.
Where I think conventional advice falls shortest is realistic expectation-setting. Patients are routinely told exercise “will help”, without being told that meaningful change often takes 6 to 8 weeks to become noticeable, and full tendon adaptation can run to a year. That gap between expectation and biology is why so many people abandon home programmes just as they’re about to start working.
If you take one thing from this, prioritise the isometric phase properly rather than rushing toward strength work you’ve read is more effective. The pain relief it provides isn’t a shortcut, it’s the mechanism that makes consistent, correctly dosed loading possible in the first place. Supervised guidance from a hip flexor strain recovery style structured timeline, rather than a static leaflet, is what actually keeps people progressing through the stages instead of stalling.
— Ivan
Book a physiotherapy assessment for your hip pain
If home exercises haven’t settled your symptoms, or you’re unsure whether you’re progressing through the stages correctly, a hands-on assessment closes that gap fast. Parks Therapy Centre offers what a printed exercise sheet can’t: a physiotherapist who tests your specific movement patterns, adjusts your dosage as you respond, and catches compensations before they become setbacks.
A typical assessment includes a detailed history, strength and movement testing around the hip and pelvis, and a personalised progression plan built around your current stage, whether that’s early isometric work or a return to running. Parks Therapy Centre accepts most major health insurance providers alongside private bookings, so check your policy’s physiotherapy cover before your visit. If pain has persisted beyond a few weeks of self-guided exercise, or sleep and daily activity are still affected, book a physiotherapy assessment to get an individualised plan rather than continuing to guess at your own progression.
This article is general information, not a substitute for advice from a qualified doctor. Consult a qualified healthcare professional about your own circumstances before acting on anything here.
Sources
Recommended