
7 Steps to Returning to Running After Injury for UK Runners

Pass a basic set of readiness tests first, then follow a progressive run/walk programme rather than jumping straight back into your old mileage. Add two strength sessions a week to rebuild tissue capacity, and use clear soreness rules to decide when to hold, drop back, or push on. Skip any of these three and re-injury risk climbs sharply.
TL;DR:
Most runners can return safely after injury by passing functional tests such as brisk walking for 30 minutes and controlled single-leg hop and squat assessments with at least 80% symmetry.
Strength sessions twice weekly focus on calf, glute, and thigh stability to absorb impact forces during running, especially if progressing to plyometrics and higher loads.
Progression through a structured run/walk schedule should be slow, with at least two symptom-free sessions per step before advancing, and recovery timelines varies by injury type.
Soreness during training is normal, but persistent or increasing pain requires adjusting the plan or seeking clinical review before further load increases.
Careful footwear management, including tracking mileage and alternating pairs, reduces recurrent strain and injury risk during rehab.
Table of Contents
How do you know you’re ready to return to running after injury?
Before any structured run/walk plan begins, your tissues need to prove they can tolerate load without a flare-up the next day. Clinicians use a small set of functional tests because they expose weaknesses that walking alone never reveals.
Start with a 30-minute brisk walk. If you can complete it without pain during the walk and without your symptoms worsening the following day, that’s your first green light. This single test filters out a huge proportion of people who aren’t ready, because running loads the same tissues at roughly triple the force of walking.
From there, move on to lower-limb specific checks:
Single-leg hop test: hop on the injured side five times, landing under control each time, and compare the quality (not just the distance) with the uninjured leg.
Single-leg squat control: lower into a quarter squat on one leg without the knee wobbling inward or the hip dropping.
Calf raise benchmark: most rehabilitation protocols look for around 20 to 25 single-leg heel raises with good form, roughly matching the uninjured side.
Symmetry check: any test scoring below 80% of the uninjured limb’s performance signals you need more preparatory strength work first.
The return to run progressive programme from Right Decisions builds these functional checks into a formal preparatory phase precisely because skipping them is where most self-directed comebacks go wrong.
Certain symptoms mean you stop testing altogether and seek medical review rather than pushing through. Bone pain that’s sharp, localised, and worsens with impact; pain that wakes you at night; or swelling that hasn’t settled despite rest all warrant clinical assessment before you attempt any running. These aren’t soreness signals to manage yourself. They’re red flags that suggest the tissue isn’t simply “tight” but genuinely under-recovered, and bone stress injuries in particular need medical clearance before load returns.
What strength and mobility work prepares your body to run again?
Running is a series of single-leg impacts, roughly 1,500 to 1,800 per mile. If your calf, glute, and quad strength can’t absorb that repeatedly, your comeback stalls at week two rather than week eight. This is why every credible return-to-run protocol pairs the running schedule with a genuine strength programme, not just stretching.
Two sessions a week, on non-consecutive days, is enough to build capacity without adding fatigue that compromises your run days. A workable template looks like this:
Heavy calf raises — 3 to 4 sets of 8 to 12 reps per leg, adding weight (a rucksack or a barbell) once body weight feels easy.
Bulgarian split squats — 3 sets of 8 to 10 reps per leg, focusing on control through the knee rather than speed.
Single-leg deadlifts — 3 sets of 8 reps per leg to build hip and hamstring stability, which protects the knee during stance phase.
Short hops and cone drills — introduced once single-leg squats and calf raises are pain-free, starting with 3 sets of 5 low-height hops before progressing to lateral cone touches.
Plyometric work like hopping and bounding should come in gradually, usually once you’ve comfortably passed the readiness tests above. Rushing this stage is a common mistake: plyometrics load tendons far more aggressively than steady jogging, so a runner with lingering Achilles or patellar tendon irritation should delay this piece specifically, even if the rest of the plan is progressing well.
Schedule these sessions on your rest days between runs, not immediately before or after a run day, so you’re not asking fatigued muscles to run the next morning. Cross-training, cycling, swimming, or an elliptical machine, fills the gap on remaining days and keeps your cardiovascular fitness ticking over without the impact of running. Building general strength and control also underpins work like Pilates for runners, which many people use specifically to sharpen hip and core stability during a comeback.
One detail runners overlook: footwear age matters as much as footwear choice. Trainers lose meaningful cushioning and support somewhere between 300 and 500 miles, well before they look worn out. Alternating between two pairs, rather than running every session in the same shoe, also seems to reduce repetitive strain on the same tissue structures by slightly varying the load pattern each time.
Pro Tip: Keep a simple spreadsheet logging mileage per shoe. Most runners have no idea how many miles their current trainers have covered, and that blind spot is an easy, avoidable contributor to re-injury.
For a fuller breakdown of exercises by session, the step-by-step post-injury training plan covers a wider set of options than there’s room for here.
What does a progressive run/walk schedule to 30 minutes look like?
There’s no single universal timeline, because tissue type dictates pace. Muscle strains generally adapt within days to a few weeks; tendon issues need 8 to 12 weeks or longer to remodel properly; bone stress injuries typically need 12 weeks or more before full loading resumes, according to clinical guidance on tissue healing timelines. That’s the honest range you’re working within, not a fixed countdown.
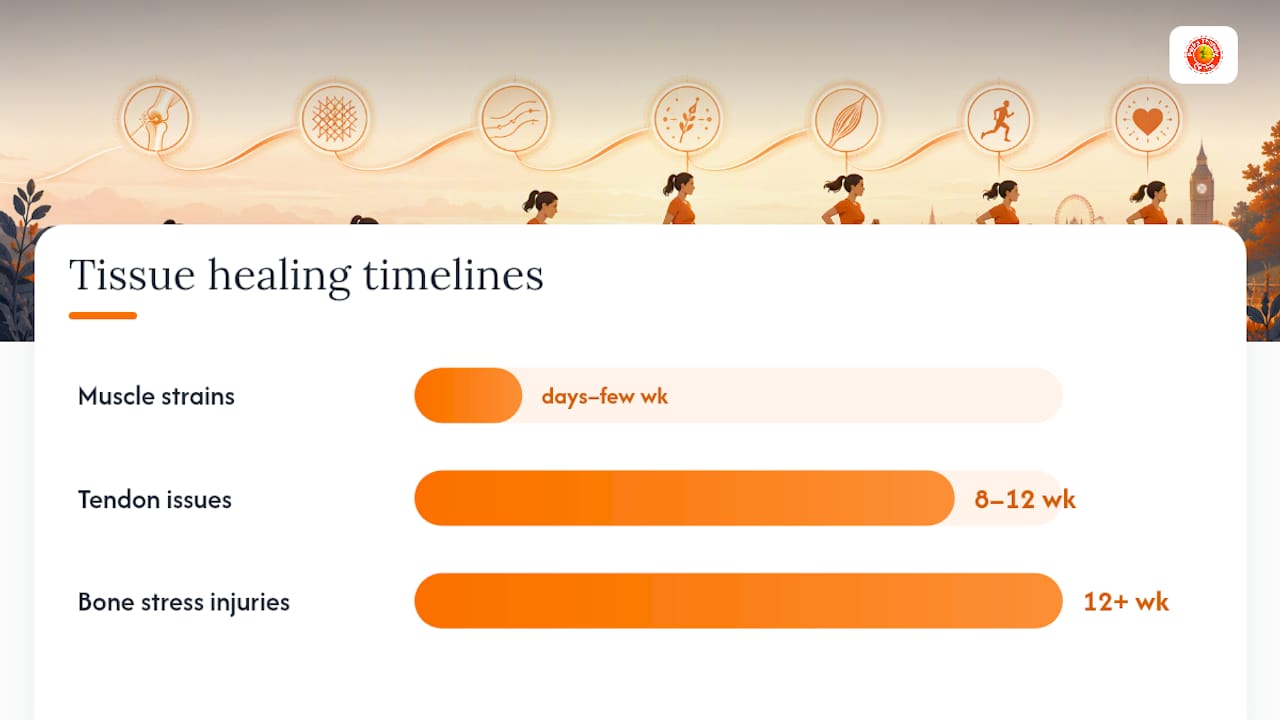
What’s consistent across every credible protocol is the shape of the progression: short run intervals broken up by walking, gradually lengthening the run portion and shortening the walk portion until you’re running continuously.
The NHS return-to-running guidance and the Runner’s World run/walk plan both follow this pattern, and the steps below reflect that consensus:
Step 1: 7 repeats of 2 minutes running, 1 minute walking (21 minutes total).
Step 2: 6 repeats of 3 minutes running, 1 minute walking (24 minutes total).
Step 3: 5 repeats of 4 minutes running, 1 minute walking (25 minutes total).
Step 4: 5 repeats of 5 minutes running, 1 minute walking (30 minutes total).
Step 5: 3 repeats of 9 minutes running, 1 minute walking (30 minutes total).
Step 6: 2 repeats of 15 minutes running, 1 minute walking (31 minutes total).
Step 7: 30 minutes of continuous running.
Run every other day rather than daily, at least through the early steps. This isn’t caution for caution’s sake. Muscle and tendon adapt to load in the 24 to 48 hours afterwards, and running again before that window closes is one of the most common reasons a run/walk plan stalls. The NHS guidance is specific on this point, recommending alternate-day running and capping weekly increases at roughly 10%.
The rule for moving between steps is straightforward: complete a step symptom-free at least twice before advancing. If step 3 goes well on Monday but leaves you slightly sore on Tuesday, you repeat step 3 rather than jumping to step 4. Two clean sessions in a row is the signal to progress, not one good session followed by hope.
Order matters just as much as pace. Clinicians increasingly use what’s called the FDI principle, frequency first, then duration, then intensity, when deciding what to add next. That means once you’re comfortable with the run/walk pattern, you first add another session per week before you lengthen any individual run, and you only introduce faster efforts like strides once both of those are settled. The FDI framework from Up and Running PT exists because runners overwhelmingly default to adding intensity first, speed and hills, when it should be the last variable touched.
Timelines vary hugely by injury. A mild calf strain might move through all seven steps in three to four weeks. A tibial stress fracture, by contrast, often needs the preparatory walking and strength phase alone to run 6 to 8 weeks before any running steps begin, and progression through the steps themselves proceeds more slowly with longer gaps between advancements. If you’re recovering from a stress fracture, treat every timeline here as a floor, not a target, and lean on medical clearance rather than the calendar.
Ankle injuries carry their own nuance worth flagging separately: proprioception (your ankle’s sense of position) often lags behind strength recovery, so a runner who feels strong on a straight path can still roll the same ankle on uneven trail. The ankle sprain rehabilitation guide covers balance work specific to that pattern.

How do you interpret soreness during your comeback?
Not all soreness means stop. The trick is reading when discomfort shows up, because that timing tells you far more than its intensity does.
Clinicians generally use a three-point rule based on when soreness appears:
Soreness that eases within the first few minutes of warming up: normal adaptation. Continue the session as planned.
Soreness that persists or worsens during the session: stop that session and repeat the same step next time rather than advancing.
Soreness that’s still present the next morning, or that causes a limp: take two full rest days, then restart at an earlier step, and consider getting the area assessed if it recurs.
This matrix comes from protocols clinicians actually use with runners returning after injury, not a generic pain scale, and it’s detailed in the Runner’s World soreness rules.
Mild, tolerable discomfort during early return-to-run sessions is a genuinely normal part of tissue adapting to new load, and it isn’t automatically a sign you’ve done something wrong. What matters more is the trend across sessions rather than any single day. If Tuesday felt fine, Thursday felt slightly stiff, and Saturday felt worse than Thursday, that upward trend is the real warning, not any one uncomfortable session in isolation. Keeping a short log, even three words per session, “fine”, “tight”, “sore”, makes that trend visible in a way memory alone rarely manages.
Two groups need a more conservative reading of all of this. Anyone recovering from a bone stress injury should treat any next-day soreness as a reason to stop and seek review, not just drop back a step, given how slowly bone remodels. Post-surgical runners, particularly after knee procedures, should follow their surgeon’s specific loading timeline over any generic soreness rule, since surgical tissue has its own healing sequence that a standard run/walk plan doesn’t account for. The knee strengthening guide for post-surgical rehab outlines that distinction in more depth.
What do practical run/walk sessions actually look like?
Theory is easier to follow when you can see exactly what a session involves, minute by minute, rather than working from a description alone.
Here’s how the first several steps translate into an actual training week, assuming you’re running every other day:
Monday, Step 1: Warm up with 5 minutes brisk walking and a few dynamic leg swings, then run 2 minutes, walk 1 minute, repeated 7 times. Cool down with 5 minutes walking and calf stretches.
Wednesday, Step 1 (repeat): Same structure. Only advance to Step 2 if Monday’s session produced no next-day soreness.
Friday, Step 2: Run 3 minutes, walk 1 minute, repeated 6 times, same warm-up and cool-down either side.
Sunday, Step 2 (repeat) or Step 3: Advance only if Friday felt clean.
Pace every run interval at a conversational effort, a pace where you could hold a sentence without gasping. This matters more than it sounds; runners returning from injury consistently run these early intervals too fast because the segments feel short, and that’s exactly when overload creeps back in unnoticed.
Surface choice deserves attention too. Flat, even paths or a treadmill are kinder to healing tissue than trail routes with cambers and roots, at least for the first several steps. Save uneven terrain for once you’re comfortably running continuously. Trainers should be a pair you already know suits your gait, not new shoes broken in during rehab, since new footwear introduces its own variable exactly when you’re trying to control for everything else.
Pair each run session with the calf raises and single-leg squat holds from your strength programme, done on separate days rather than immediately before or after the run itself. A few minutes of ankle circles and hip openers before each session, and a brief walk-and-stretch cool-down after, rounds out a template that barely changes week to week; only the run/walk ratio moves.
If your tissue is particularly irritable, meaning even short run intervals provoke next-day discomfort, slow the whole plan down rather than abandoning it. Stretch each step over three or four sessions instead of two, lengthen the walk portions relative to the standard ratios above, and consider dropping to every third day rather than every other day until symptoms settle. The structure stays the same; only the pace of climbing through it changes.
How does a physiotherapist tailor this in clinic?
A clinic assessment starts with your injury history and a gait analysis, watching how you actually move rather than relying on a generic checklist. That’s the piece self-guided plans can’t replicate: seeing whether your hip drops on landing, or whether one calf is quietly doing less work than the other.
From there, a physiotherapist adjusts the standard progression to fit the specific tissue involved:
Achilles tendinopathy typically needs a slower plyometric introduction and heavy, slow-resistance calf loading before any hopping begins.
Patellofemoral pain often responds to hip and glute strengthening as the priority, sometimes ahead of direct knee work.
Stress fractures require the longest preparatory phase and often benefit from load monitored session by session rather than by the calendar alone.
A physiotherapy assessment typically sits alongside sports injury treatment, podiatry, and Pilates-based strengthening, so a runner with a gait issue and a weak hip can address both in one coordinated plan rather than guessing which matters more.
Supervised rehab makes the most sense when you’ve stalled on the same step for more than two or three attempts, when pain patterns don’t fit neatly into the soreness rules above, or when you’re managing a bone stress injury and need someone monitoring load week to week rather than relying on self-report alone.
Why the standard advice on returning to running undersells strength work
Most return-to-run content treats the run/walk schedule as the whole plan and strength training as an optional extra. That gets the priority backwards. The schedule tells you how much load to apply; strength work determines whether your tissue can actually absorb it. A runner who nails every interval in the NHS or Runner’s World steps but skips the calf raises and single-leg work is still running on borrowed capacity, and it tends to show up as a new problem a few weeks after the “successful” comeback, not during it.
The other place conventional advice falls short is soreness interpretation. Too many runners treat any discomfort as a red flag and stop entirely, which delays recovery for no reason, while others push through next-day pain because a session “felt fine” at the time. Both mistakes come from judging a single day instead of a trend. If you take one thing from this plan, let it be the readiness tests before you start, and the discipline to log soreness honestly rather than optimistically, all the way through.
— Ivan
Book a running assessment at Parks Therapy Centre
Parks Therapy Centre gives you what a self-directed comeback can’t: a trained eye watching your gait, functional tests scored against your own baseline, and a rehab plan adjusted to your specific injury rather than a generic template. If you’ve stalled on the same run/walk step more than twice, or you’re managing a stress fracture and need someone tracking load properly, that’s the point to bring in a physiotherapist rather than pushing on alone.

A typical assessment covers your injury history, a gait analysis, and the same single-leg strength and hop tests described earlier in this guide, so bring details of when the injury happened, what treatment you’ve already had, and your current trainers if possible. The centre accepts private payment and a range of insurance cover, and sessions run across multiple clinic locations. You can also start with structured self-guided support through the post-injury training plan or add Pilates for runners to your strength routine between clinic visits. To get a plan built around your own injury and gait, book an assessment online and bring your running history to the first session.
Sources
The programme in this guide draws on published clinical protocols rather than general fitness advice, and it’s worth reading the originals if you want the full detail behind any step.
This article is general information, not a substitute for advice from a qualified doctor. Consult a qualified healthcare professional about your own circumstances before acting on anything here.
FAQ
What is the 3-3-3 rule for running?
There’s no single clinically agreed definition of a “3-3-3 rule” in the return-to-running protocols referenced here; if you’ve seen it elsewhere, treat it as informal advice rather than a clinical standard, and rely instead on the readiness tests and soreness rules covered above.
How do you know when you can run again after an injury?
You’re ready when you can walk briskly for 30 minutes without pain or next-day worsening, and you pass single-leg hop, squat control, and calf raise tests at close to the strength of your uninjured side. Anyone with bone pain, night pain, or unresolved swelling needs clinical clearance before testing further.
What is a good schedule for returning to running after an injury?
Advance a step only after two symptom-free sessions in a row.
How long does it take to regain running fitness after an injury?
It depends heavily on the tissue involved: muscle strains can move through the full progression in three to four weeks, tendon injuries often need 8 to 12 weeks, and bone stress injuries typically need 12 weeks or more before full loading resumes. A physiotherapist assessment at a clinic like Parks Therapy Centre can give you a realistic timeline specific to your injury.
Recommended